How to Build a Dynamic Territory Routing Engine in HubSpot (Without Hardcoding Reps)
Most RevOps teams route leads with a wall of if/then branches: one per state, each with a rep's name baked into the logic. It works on day one and turns on you the day a rep leaves. Here's how to build territory routing that needs zero workflow edits when a standard rep or territory changes.
Ask most RevOps teams how leads get routed by territory, and they'll point you to a workflow. Open that workflow, and you'll find a wall of if/then branches: If State = A, assign Rep X. If State = B, assign Rep Y. Fifty branches, one per state, each with a rep's name baked directly into the logic.
It works. That's the trap.
Because the day a rep leaves, or a territory shifts, that same workflow turns on you. Now you're inside a mission-critical automation, hunting down every branch with the old rep's name, swapping usernames by hand, and hoping you don't break enrollment for the other 49 states on the way out. The workflow everyone trusts to save time is quietly one personnel change away from costing you an afternoon.
There's a better way to build this. We recently rebuilt our own routing from the ground up, and the version we landed on needs exactly zero workflow edits when a standard rep or territory changes. Here's the architecture, why it holds up at scale, and how to stress-test it without touching your live data.
Why hardcoded routing breaks
Baking rep assignments into workflow branches works on day one and fails on every day after, for three reasons:
- It turns RevOps into backend developers. Your team shouldn't have to edit production automation every time HR sends a new-hire announcement.
- It invites human error. Every edit to a live assignment workflow is a chance to misroute leads or break enrollment for territories that had nothing to do with the change.
- It doesn't extend. The day you want to route a CSM or an onboarding specialist off the same geographic map, you're rebuilding all 50 branches a second time. And a third.
The problem underneath all three is the same: the workflow is storing data (which rep owns which state) inside logic. Those are two different jobs, and they don't belong in the same place.
The fix: separate the data from the logic
So we stopped asking the workflow to make assignment decisions. Instead, we turned it into a messenger and moved the territory data into a lookup table, using a HubSpot Custom Object.
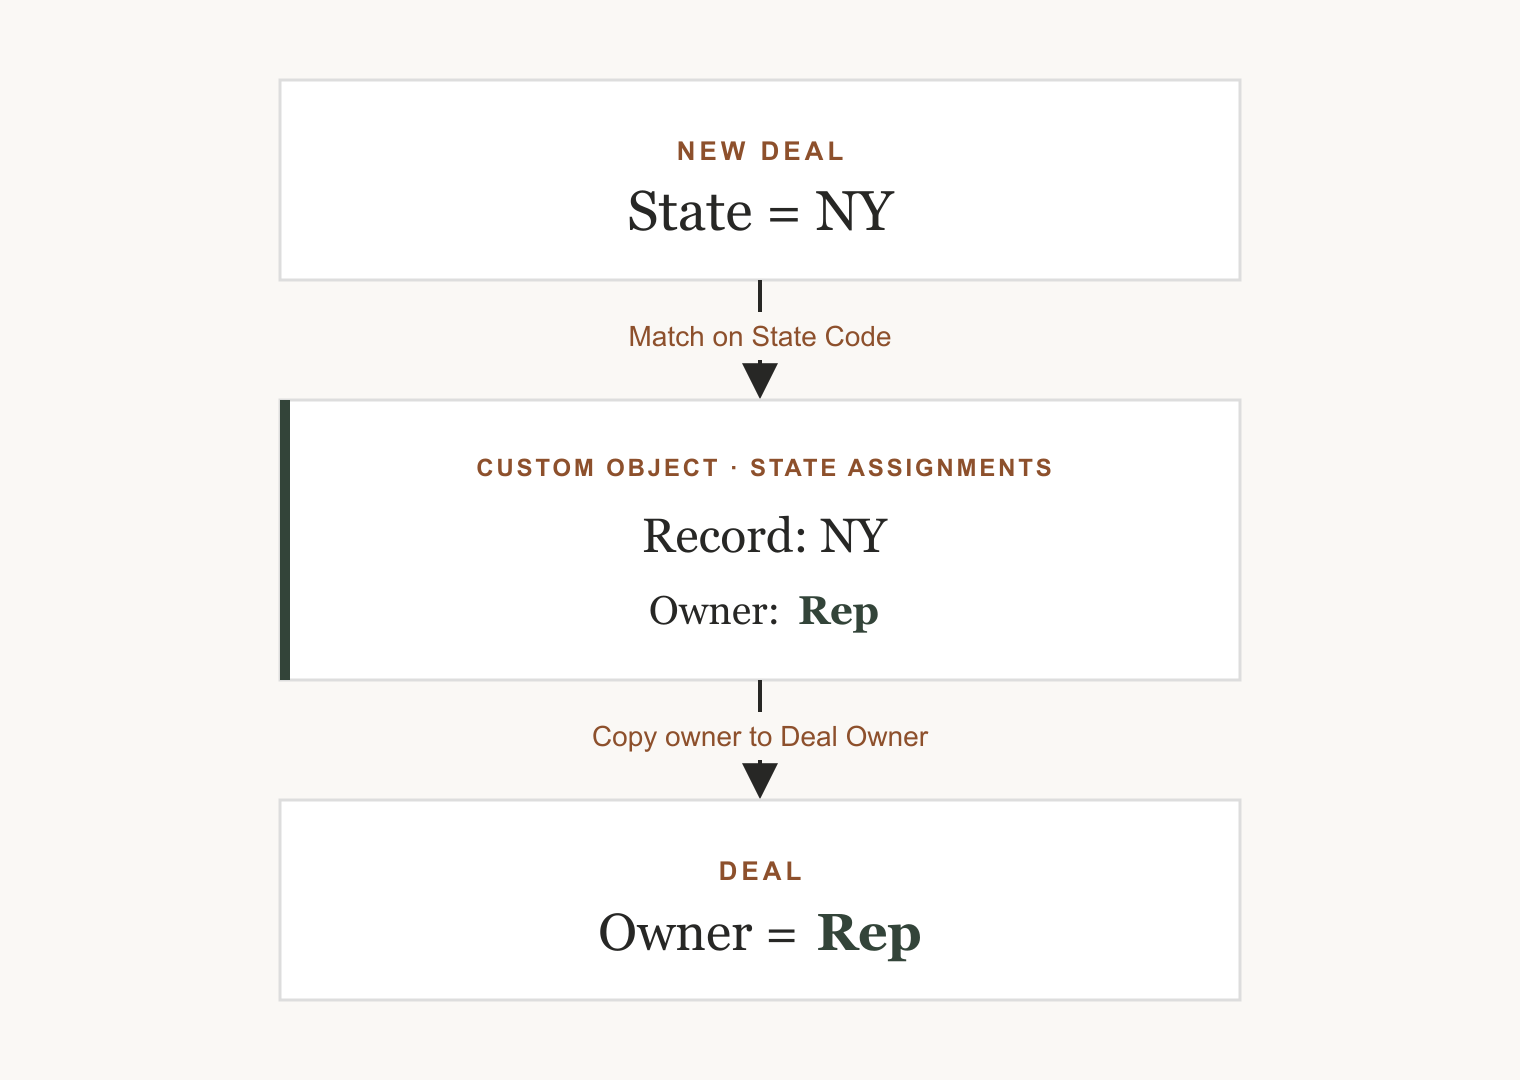
We built a Custom Object called State Assignments (internal name: state_assignments). Its Primary Display Property is a unique two-letter State Code, and each record represents one territory with a standard HubSpot Owner assigned to it. NY is a record. TX is a record. Each one holds its own rep.
The workflow's only job now is to connect a deal to the right record. For 98% of your territories, it uses HubSpot's native Create Associations by Matching Property action to link the deal's native State field to the Custom Object's State Code, then copies the owner over. That's it. No branches. No names.
Watch what this does to the two scenarios that used to hurt:
A rep leaves or joins. The old way: open the workflow, find the branch, swap the user, republish, hope. The new way: open that one State record in the CRM, change the owner in a dropdown, save. The workflow adapts instantly, because you never touched the workflow. You touched the data it reads.
You add CSM or support routing later. The old way: build a brand-new workflow with another 50 branches. The new way: add a "CSM Owner" field to the Custom Object you already have, and pull it through the same matching action. Same map, new layer, no rebuild.
Handling the curveballs: split states and missing data
Clean architecture meets messy reality fast, and ours was no exception. Two curveballs showed up almost immediately.
First, one state needed to be split in two. North and South, divided by zip code prefix, with a different rep on each side. Second, some leads arrived with a state but no zip code at all, which meant the split had nothing to split on.
We could have forced this into the Custom Object by stuffing it full of zip code strings, but that would have bloated a lean data model to handle a single exception. So we made a deliberate call: keep the exception local. Handle this one state inside the workflow, and leave the other 49 hands-off in the lookup table.
Here's the local exception flow:
- The zip code check. When a deal enters the workflow, it first checks whether it belongs to the split state. If it does, the workflow reads the postal code. Northern prefixes assign directly to the North rep; southern prefixes go to the South rep.
- The missing-data fallback. If a lead comes in from the split state with no zip code, the workflow catches it before it can fail and drops it into a native Round-Robin Rotation, splitting those unmapped leads 50/50 between the two regional reps.
One state, ring-fenced. Everything else stays clean.
How to test it without wrecking your CRM
A routing engine this size deserves more than one fake record and a hopeful refresh. You need to fire every branch at once, standard states, split territories, missing data, all of it, and you need to do it without leaving a mess of test logs in your database.
The move is an Import-and-Rollback: import a batch of test records, watch the engine sort them, then roll the whole batch back out.
1. Build a stress-test CSV. Four rows, each aimed at a different branch. Include both Company and Deal data in the same file:
- Row 1 (Standard state): State
NY, Zip10001. Should route automatically via the Custom Object lookup. - Row 2 (Split state, North): State
CO, Zip80202. Should hit the local exception and assign to the North rep. - Row 3 (Split state, South): State
CO, Zip80903. Should hit the local exception and assign to the South rep. - Row 4 (Missing data): State
CO, Zip blank. Should hit the fallback and trigger the 50/50 round-robin.
2. Run the import. Turn the workflow on, set to enroll new records only, and import the CSV as a Multiple Object Import (Companies + Deals). Make sure the first step of your workflow copies the postal code from the associated Company onto a custom Deal Postal Code property, so your zip branching has something to read. Wait about 60 seconds, then confirm all four deals landed on the right owners.
3. Roll it back. Once the engine passes, go to CRM Settings > Data Management > Imports, find your test import, open the More menu, and choose Delete imported records. HubSpot removes every company and deal that file created, and your CRM is back to pristine, ready for launch.
The takeaway
Use workflows for logic, not for storage. The moment you find yourself editing production automation to update a fact, that fact belongs in a lookup table instead.
Treat your Custom Objects as the dynamic map for standard routing, keep your genuine exceptions ring-fenced in local branches, and you get both halves of what you actually want: a data model lean enough to maintain in a dropdown, and a routing engine built to scale past the next reorg.
Marketing Systems Consultant. I help service businesses find and fix the gaps between their website, leads, and sales.